![]()
Operating Principle of Hydropneumatic gun "AQUATECH"![]()
Technical Service of Hydropneumatic gun "AQUATECH" ![]()
Hydropneumatic spear gun of a “Dnepr”
OPERATING INSTRUCTIONS
MAINTENANCE AND GUN STORAGE
POSSIBLE FAULTS AND METHOD OF THEIR ELIMINATION
Hydropneumatic spear gun of a “Black Sea”
OPERATING INSTRUCTIONS
MAINTENANCE AND GUN STORAGE
SAFETY RULES
Operating Principle of Hydropneumatic gun "AQUATECH"
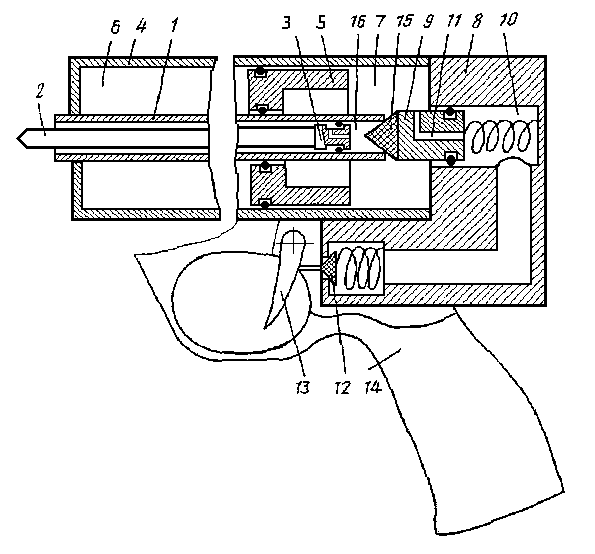
In initial state spear 2 is extracted from barrel 1, the control 12 and return 15 valves are both closed, and compressed air, contained in compression chamber 6, has moved annular piston 5 to the extreme right hand position. On submerging gun, locking chamber 7, trigger cavity 10, transfer channel 11 and barrel bore cavity 16 all fill up with water and the pressure in these parts equals the pressure of the surrounding environment. When cocking the gun, spear 2 is inserted in barrel 1 and effort applied by hand, using a loading bar over tip of spear 2, to push charge piston 3 down with a force sufficient to overcome valve 15. When this is achieved, return valve 15 opens and water from barrel bore cavity 16 progressively goes into locking chamber 7 and displaces annular piston 5 to the left, thus reducing volume of compression chamber 6 and further increasing the air pressure within it. After ceasing transmission of any hand loading effort via spear 2 to charge piston 3, pressure in barrel bore cavity 16 takes up equal pressure to the surrounding environment, return valve 15 closes, and pressure in locking chamber 7 becomes equal to increased pressure in compression chamber 6. Pressure in trigger cavity 10 equals pressure in locking chamber 7, since this communicates through transfer channel 11. When finger pressure is applied to trigger hook 13, this opens control valve 12. Once this happens, water in locking chamber 7 progresses through transfer channel 11, trigger cavity 10 and exits through control valve 12 to surrounding environment. However a throttling effect caused by the very small diameter of transfer channel 11 limits the water flow through it, so it cannot stop the rapid creation of a large pressure difference between locking chamber 7 and trigger cavity 10 when control valve 12 opens. Hence opposing but unequal forces due to a pressure differential are acting on either face of trigger piston 9. Note that as well as the high pressure of the locking chamber 7, part of the front face of the trigger piston 9 is also exposed to the barrel 1 which is at the pressure of the surrounding environment, but the barrel cross-sectional area is less than that of the trigger cavity 10 to which the rear face of trigger piston 9 is exposed. The resultant force is such that it opens return valve 15 and displaces trigger piston 9 and return valve 15 to the right. Through opening return valve 15, water from locking chamber 7 can escape via the access now created to barrel 1, driven under the influence of expanding compressed air which pushes piston 5 to the right, causing the departure of spear 2 from barrel 1.
For loading gun with a convenient pumping action using the spear, it is necessary to first put pressure on trigger hook 13 and hold it down while inserting spear 2 in barrel 1 to the desired depth. During this action, the water contained in barrel bore cavity 16 which is displaced by movement of charge piston 3 is ejected to the surrounding environment through return valve 15, transfer channel 11 and the now open control valve 12. After releasing trigger hook 13, control valve 12 is closed, so remaining water in barrel bore cavity 16 which is displaced through subsequent pushing of spear 2 and charge piston 3 is injected into locking chamber 7, once sufficient pressure is created to open return valve 15. To repeat this last action it is necessary to first pull out spear 2 from barrel 1 to the desired length. This action is possible as additional water from surrounding environment flows into barrel bore cavity 16 through a relief valve contained in charge piston 3. Pulling the spear forward opens this valve, while pushing the spear back closes it, as an "O" ring moves either backwards or forwards on the charge piston body to uncover or close off a relief port built into it. It is then possible to again push on spear 2 to once more open return valve 15 and inject more water into locking chamber 7. Through conducting this procedure of partially pulling out and then pushing on spear 2 a number of times it is possible to achieve the necessary power in the gun in incremental steps, making the charging task easier for the user.
Technical Service of Hydropneumatic gun "AQUATECH"
![]()
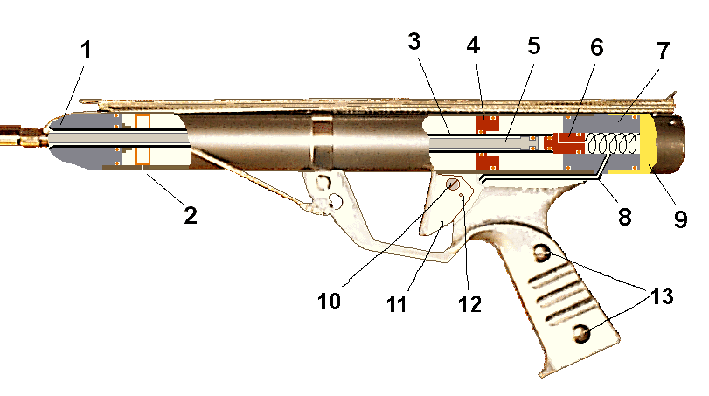
Hydropneumatic spear gun of a “Dnepr”.

1 - spring; 2, 4, 5, 19 - sealing "O" rings; 3 - transfer channel; 6 - piston; 7 - compression chamber; 8 - aperture/nipple; 9 - screw; 10 - spear shaft; 11 - barrel; 12 - slide ring; 13 - plastic guide; 14 - tip; 15 - trigger piston; 16 - annular piston; 17 - concentric barrel; 18 - air pump; 20 - fastening; 21 - opening aperture; 22 - control valve; 23 - trigger hook; 24 - grip handle.
![]()
OPERATING INSTRUCTIONS
WARNING: before use of production closely read the operation manual!!!
For loading a spear gun, it is necessary to switch off of line release and insert a spear shaft 10 in barrel 11 for convenient loading length. Then it is necessary to include of gun line release and to push spear shaft 10 with help of loading bar into barrel 11 as far as it will go.
For discharging a spear gun, take the spear shaft 10 out from barrel 11 and carry out a dummy shot in water (at squeeze of a trigger hook 23) to release pressure built up from the previous loading action.
For checking working capacity of a spear gun, perform the loading operation outlined above. The spear shaft 10 must be removed before firing gun. Carry out a dummy shot in water (to squeeze of a trigger hook 23) to release pressure built up from the previous loading action.
For reduction of force of fight of a gun, it is necessary to put forward in part a spear shaft 10 of a trunk of 11 guns.
For increase in force of fight of a gun, it is necessary to make in addition 1 or a little hydropumping action a spear shaft 10. This enables the gun's unique hydropumping action to further increase the tank air pressure by injecting more water for a stronger shot.
For loading of gun not on full capacity, it is necessary to insert a spear shaft 10 in barrel 11 for necessary length, at open position of line release. Then close position of line release and push spear shaft 10 with help of loading bar into barrel 11 as far as it will go. Thus the spear shaft 10 will have low speed of flight.
The gun can be charged short a spear 10. In that case the spear shaft 10 has high speed of flight at small kinetic energy.
The air pump 18 is used to add compressed air to the compression chamber 7 in body tube of the gun. The aperture 21 of air pump 18 is placed with aperture of the nipple 8 lined up so that air can be injected through the valve built into the wall of the gun body. For convenience of overlapping of aperture 21 with aperture of the nipple 8, it is necessary to unscrew the air pump 18 from fastening 20. The fastening 20 is placed with opening aperture of the nipple 8 lined up with the small body tube aperture of the nipple 8 so that air can be injected through the valve built into the wall of the gun body. Fix a fastening 20 to a body tube of the gun and screw the air pump 18 to a fastening 20.
It is better to hold a gun hands in area fastenings 20 of air pump 18, and a foot to hold the handle of air pump 18.
To release compressed air 7 from the body tube it is necessary to unscrew screw 9 and let air flow from the tank. Power can be adjusted before diving by varying air pressure in the body tube tank.
MAINTENANCE AND GUN STORAGE Carrying out of technical service for gun is necessary at conclusion of hunting season, whether summer or winter, and before storage or a protracted period of transportation.
For carrying out of technical service for gun is necessary to unscrew grip handle 24, extract the spring 1 and trigger piston 15, then wash out all exterior and interior parts of the gun with fresh water. Check the transfer channel 3 in trigger piston 15. In the event there is an obstruction in transfer channel, clean it thoroughly. Dry thoroughly, lubricate threads and sealing “O” ring, then assemble in reverse order.
WARNING: do not lubricate a barrel 11, a sealing “O” ring 5 on the piston 6 and sealing “O” rings 2 and 4 on the trigger piston 15, it harmful to reliable work of a gun. Sand sticks to a sealing “O” ring 5 on the piston 6, gets inside of a gun, sticks to the trigger piston 15 and gets jammed it!!! If you dive in very salty water it is recommended to purge your gun with fresh water after each hunting. With muzzle pointing upwards partially fill barrel 11 with fresh water. Insert spear shaft 10 with piston 6 into barrel 11 (it is necessary to switch off of line release). As the spear 10 is pushed into the barrel 11 water will be ejected in a stream through the trigger aperture. Push the spear 10 until all water stops coming out of the trigger and then pull the spear 10 forwards out of the barrel 11.
Carrying out of technical service for the gun is necessary at conclusion of the hunting season, whether summer or winter, and before storage or a protracted period of transportation. Manufacturer recommends speargun is stored in dry locations between 5 and 40 degrees Celsius to avoid damage.
Condition Fault Cause Fault Method Elimination 1. Spear input into barrel with effort less than 10 kgf. a) Insufficient air pressure in gun. b) Wear at sealing "O" ring 5 at piston 6 of spear shaft 10. Increase pressure in compression chamber 7 help of the air pump 18
Replace sealing "O" ring 5 at piston 6 of spear shaft 10. 2. After loading gun spear slowly moves out. Leaking sealing "O" ring 4 on trigger piston 15. Replace sealing "O" ring 4 on trigger piston 15. 3. Gun not loading. a) Obstruction in aperture 3 within trigger piston 15.
b) Sand sticks to the trigger piston 15. Clean aperture 3 within trigger piston 15.
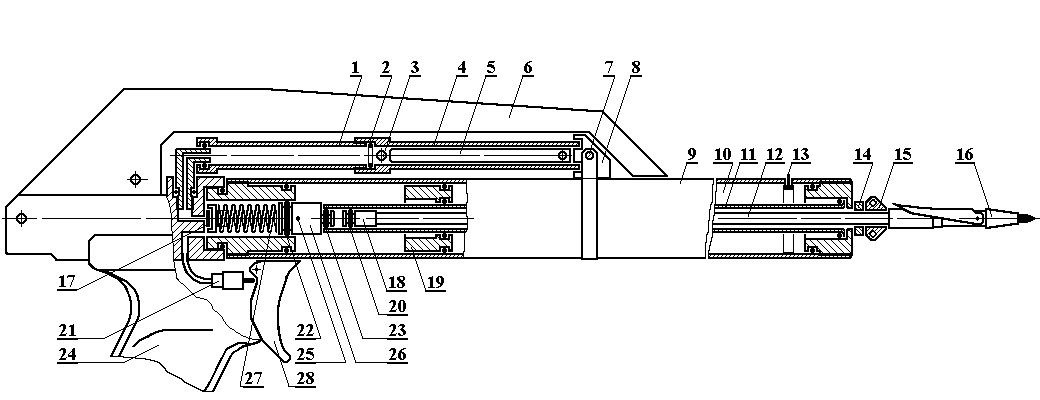
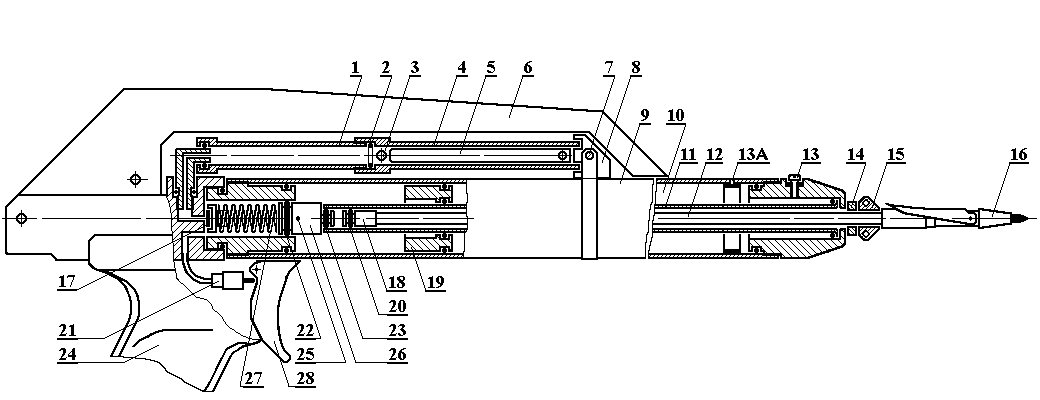
Clean sand to the trigger piston 15. Hydropneumatic spear gun of a “Black Sea”. 1, 4 – hydropump; 2, 20, 22, 23 – sealing "O" rings; 3 – holes; 5 – rod of the hydropump; 6 – handle of the hydropump; 7 – screw; 8 – fastening of the hydropump; 9 – concentric barrel; 10 – compression chamber; 11 – barrel; 12 – spear shaft; 13 – valve/nipple; 14 – slide ring; 15 – plastic guide; 16 – tip; 17 – valve of the hydropump; 18 – piston; 19 – annular piston; 21 – control valve; 24 – grip handle; 25 - transfer channel; 26 – trigger piston; 27 - spring; 28 – trigger hook. Hydropneumatic spear gun of a “Black Sea”.
1, 4 – hydropump; 2, 20, 22, 23 – sealing "O" rings; 3 – holes; 5 – rod of the hydropump; 6 – handle of the hydropump; 7 – screw; 8 – fastening of the hydropump; 9 – concentric barrel; 10 – compression chamber; 11 – barrel; 12 – spear shaft; 13 – screw; 13A – valve/nipple; 14 – slide ring; 15 – plastic guide; 16 – tip; 17 – valve of the hydropump; 18 – piston; 19 – annular piston; 21 – control valve; 24 – grip handle; 25 - transfer channel; 26 – trigger piston; 27 - spring; 28 – trigger hook. OPERATING INSTRUCTIONS Preparation of "Black Sea" gun for shooting. Enter the water with the spear 12 removed and the line release lever swung out to the open position after pulling the trigger to release it. With the gun totally submerged, or at least submerged at the rear end, operate the hydropump lever to flood the hydropump's tubular body and the gun's internal locking chamber; five or six full strokes of the rear hydropump lever should be sufficient.
Next flood the speargun's barrel with water and then insert the spear and push it down into the barrel until it reaches the end of its travel. Very little effort will be required as the water injected during this process will be exiting through the open trigger valve. Then with the gun fully submerged pull the spear out of the barrel to about half way and then push it back in again. This action pumps more water through the gun's barrel eliminating any remaining air bubbles in the barrel and locking chamber as the spear tail's sliding "O" ring relief valve operation will allow more water to pass into the barrel from outside when the spear is pulled forwards. Repeat this spear pumping action once or twice to ensure the gun's hydraulic system is completely flooded and the spear is fully inserted. Note that a completely flooded hydraulic system is essential to the gun's shooting performance.
Swing the line release lever back to the closed position, this resets the trigger, you will hear the trigger click into position as it engages the slot in the rear of the line release lever. Closing the line release lever simultaneously closes the trigger valve and seals the hydraulic locking system which is the basis of the gun's relatively silent operation compared to other spearguns. Now arrange the shooting line on the front line hook at the muzzle and the line release lever in a series of line wraps so that the shooting line is neatly stowed on the "Black Sea" gun. The gun is now ready for charging by working the rear hydropump lever.
Charging the "Black Sea" gun. Support the rear of the gun against one knee while holding the gun horizontally across your body, one hand holding the forward section of the gun while the other hand grasps the end of the hydropump lever. With the gun submerged opening the hydropump lever outwards injects water into the gun while closing the hydropump lever back against the gun body sucks more water from the surroundings into the hydropump's tubular body. Maximum shooting power requires a full set of hydropump lever strokes that have the combined effect of injecting a volume of water equivalent to the gun barrel's internal volume. If necessary rest can be taken both between and during successive hydropump lever strokes as the hydropump has a one-way valve to stop water coming back out again. Lower power shots can be achieved by using less hydropump lever strokes per shot, however water must then enter the barrel through the spear tail relief valve once the internal water column stops pushing the spear from the gun. This slight suction action plus the shorter propulsion distance in the barrel is what produces the lower power shot even though the spear's momentum still allows it to exit the barrel, although at a lower velocity. To gain full performance from the gun and the maximum spear velocity use the full number of hydropump lever strokes indicated for your model of the "Black Sea" gun for each shot. Longer barrelled guns will require more hydropump lever strokes as a longer column of water is required to propel the spear under power for the entire length of the barrel.
The piston 18 has a greater diameter than the diameter of spear shaft 12 for it to act as a slide stop for slide ring 14 and the plastic guide 15. Note that repeated impacts from these parts can unscrew piston 18.
WARNING: periodically check that piston 18 does not unscrew from spear shaft 12 to prevent its loss!!! For safely discharging a speargun, pull the spear shaft 12 out from barrel 11 and carry out a dummy shot in water (by trigger hook 28) to release the injected water and the pressure built up from the previous loading action.
Preparation for long term storage of "Black Sea" gun. If you wish to fully dry out the gun for an extended period of storage then undo the small screw of the stainless steel collar that holds the front end of the hydropump body and then pull the collar away from the slotted front end of the hydropump's body tube. The rear of the hydropump's tubular body can be pulled off the stainless steel elbow fitting by wiggling it carefully, it is only a press fit on the end of this fitting. Swing the hydropump body and metal connecting levers away from the gun and pull the hydropump tubular body from the metal rod that is the pumping element. It will now be possible to unscrew the rear stainless steel tail cap with the elbow fitting and the attached levers as a single unit from the rear of the gun. This will expose the long internal coil spring with the valve seal on its rear end that serves as the non-return valve for the hydropump. Remove this spring. If you wish you can also remove the locking valve by putting some water in the barrel and inserting the spear.
A slight push on the spear will eject the locking valve from the rear of the gun, arrange for someone to catch it or have it fall into a suitable container positioned under the rear of the gun.
The gun barrel will now be completely open from one end to the other, you can squirt water from a hose right through the gun if you wish. The gun can be stored with the disassembled parts in different locations in your home for security reasons as without the locking valve the gun is incapable of being operated.
Reassembly of the "Black Sea" gun. Reassembly is the reverse of dismantling, use only a light oil on the locking valve "O" ring and the rear of the coil spring to lubricate the rubber disc of the one-way valve to facilitate assembly and preserve the rubber surface as the stainless steel hydropump tail cap is screwed back into place. The main "O" ring and screw threads at the rear of the gun should also be lubricated with oil before reassembly, only a few small drops are required. Also use some of the same oil on the hydropump body tube "O" rings when refitting this item. It is not recommended that you use any grease, a very light oil of SAE 10 grade should be sufficient. During use water provides the necessary lubricant for the internal moving parts, the light oil used in the re-assembly will float off after a few shots. Grease or similar sticky substances can cause sand particles to adhere which is undesirable in a gun where there are precision machined internal surfaces. As a general rule try to keep sand out of your gun by avoiding dropping it in sandy bottom locations as it is undesirable to have sand particles enter the hydropump due to its small internal passages, plus sharp sand particles have the ability to scratch metal surfaces, particularly if they are quartz type grit materials.
MAINTENANCE AND GUN STORAGE Cleaning the "Black Sea" gun after each use.
At the completion of spearfishing it recommended that you purge any remaining saltwater from inside the gun. The procedure is identical to the flooding of the gun described above except that the rear of the gun should be submerged in a tub of freshwater so that the hydropump body is covered and can take in water when the hydropump lever is operated. Make sure that the line release lever is open and lift the gun clear of the water each time that you open the hydropump lever outwards, you will see water exiting from around the trigger area each time that you do this as water is pumped through the gun's internal spaces. Closing the hydropump lever should be done while the rear of the gun is submerged in order to allow the hydropump to suck in water on each return stroke. If the tub of water is not large enough to allow the full swing of the hydropump lever when the gun is in the tub then close the hydropump lever against the gun body and then submerge the rear of the gun while holding it as close to vertical as possible. Water will then flow down under the influence of gravity into the hydropump body, watch for tell-tale air bubbles emerging as the hydropump's tubular body fills with water. Continue pumping freshwater through the gun as before.
Next fill the barrel of the gun with freshwater from a small container like a jug or bottle while holding the gun with the muzzle pointed upwards and then insert the spear. Push the spear into the gun and the water in the barrel will be driven through the locking valve as it opens, the water then moving through the locking chamber and then out of the open trigger valve. Remove the spear, refill the barrel with freshwater and repeat the insertion of the spear into the gun, then remove the spear. The gun will now be completely free of saltwater in its internal spaces.
You can leave the line release lever in the open position when storing the gun between dives, the line release lever is only closed when the gun is being charged for shooting or you wish to carry out a dummy shot without the spear in the gun. Water shot from the gun is ejected with considerable force during a dummy shot, do not use the gun as a water pistol or point it at any person even without the spear inserted. Firing the spear from the gun when not submerged is absolutely forbidden as the spear will travel great distances in air with potentially lethal consequences from both gun recoil and strike of the spear.
Carrying out of technical service for the gun is necessary at conclusion of the hunting season, whether summer or winter, and before storage or a protracted period of transportation. Manufacturer recommends speargun is stored in dry locations between 5 and 40 degrees Celsius to avoid damage.
SAFETY RULES 1. Do not charge a gun with effort big, than 40 kgf. It can lead to explosion of a gun and can cause traumas or death of the underwater hunter.
2. Carry out the loading of gun only in the water and aim spear downwards. 3. Do not aim the gun's spear at any part of other people or oneself. 4. Before exiting the water make sure you discharge the gun. 5. Never load the gun out of the water. 6. Always put the safety on, especially when swimming towards the hunting zone. 7. When meeting another hunter or swimmer, point the gun in the opposite direction. 8. If you hunt together with a buddy always keep distance of at least three times the overall length of the speargun, shockline and shaft. An even better idea is to set hunting perimeters for each of you and never come close to each other. 9. Never point the gun at yourself and don't fire it if there is even a slightest chance for the shaft to jump back and hurt you.
10. Unload the slings immediately after leaving the hunting perimeter and heading to the shore.
11. If the water is too muddy and you can't really see the target you're going to fire at - don't fire at all.
12. Every single thing you can ever think of, which is likely to create even the slightest danger for hurting yourself or the others.
Most Complete Method for Purging Salt Water from Aquatech speargun. Copyright ©
2000-2010 S.F.Kravchenko![]()
![]()
![]()
![]()
![]()
![]()
![]()
![]()
Сайт создан в системе uCoz